I am still learning and reflecting constantly on how I'm using algebra tiles in lessons, but I hope there is something in this blog post which is helpful to anybody else who wants to give algebra tiles a go. I strongly recommend the NCETM CPD materials on Algebra Tiles as an excellent resource and MathsBot as a way for students and yourself to use algebra tiles if you aren't yet ready to invest in the manipulatives yet! I've found they've had a massive impact on my teaching, students make less mistakes and retain their manipulation skills better than any other method I've previously used. I encourage you to have a go with any of your students and see the impact for yourself!
This blog is quite long so if you want to skip to find a specific bit of algebra, here is the order I've gone with:
1. Introducing Tiles
2. Collecting Like Terms (worksheet here)
3. Expanding single brackets (worksheet here)
4. Factorising single brackets
5. Expanding and simplifying e.g. 3(x+1)+2(x+2) (worksheet here)
6. Expanding double brackets e.g. (x+2)(x+3) (worksheet here)
7. Factorising quadratics
8. Completing the square
1. Introducing the Tiles:
Firstly, students need to get used to what each tile represents. It is worth spending time on this and leads well into collecting like terms (next stage) anyway. The concept of +1 and -1 shouldn't be too far of a stretch if you have taught directed or negative numbers using two sided counters as they are very similar, just square instead of circular:


Notice that the area of the tiles is what we are referring to, the 1 square is 1 unit by 1 unit with an area of 1. When introducing the x tiles, you need to show that the height of the x is 1 and the length is x so the area is x. You then need to introduce x2 in the same way using the x tiles.

At this point you may want to also expand on zero pairs (see my post on teaching directed number here:) and show how a positive x and a negative x is a zero pair, an x2 and a -x2 tile make a zero pair etc as that will help with simplifying later on.
2. Collecting Like Terms:
The algebra tiles are a really good way of showing visually what collecting like terms looks like. For example, students can see a question such as 3x + 2 + 2x + 3 initially as:

Then they can physically move the tiles to collect the same tiles together, which you can show them and ask which is easier to use to simplify? Why?

So 3x + 2 + 2x + 3 = 5x + 5
Then you can build on the work on negative numbers as zero pairs by doing questions such as 3x-2+x+4 which they can see initially as:


This rearrangement makes it easy for students to see zero pairs and whether the terms will end up being positive or negative.
Show a similar question where the numerical term will be negative, e.g. 3x+2+x-3


You can then build up to 3x + 2 - x + 1


So 3x + 2 - x + 1 = 2x + 3
This makes it easier for students to start processing zero pairs being more than just +1 and -1 and helps students deal with when terms are positive or when the terms are negative (more negative tiles than positive tiles).
E.g. x + 5 - 3x - 2


You can also then include some questions with x squared terms.
3. Expanding Single Brackets
I actually start with the diagram when expanding and factorising and do them alongside one another, initially referring to them as two different forms - expanded and factorised equivalent expressions. This is just my own preference to start off so students can see how the two are connected, I then focus on expanding to develop some fluency and removing the scaffold of the tiles for expanding before bringing back the tiles to focus on factorising afterwards again aiming to develop fluency and eventually move away from the tiles.
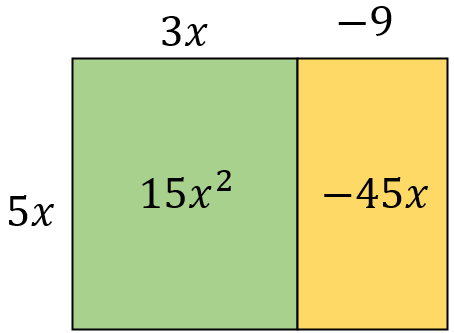
So, for example, I might start with this diagram:

I'd ask how students see the diagram. Students find the expanded form easier to see, so you have to tease out the factorised form. Discuss the fact it is a rectangle. You can talk about the area of the rectangle and the height and the length of the rectangle. I would also write each on the board: "expanded: 2x + 4" and "factorised: 2(x+2)" and discuss how and why both represent the area of the rectangle.
I'd then ask students to build some with their tiles, starting with something like 2(x+1):

Highlighting the key features (height is 2, length is x+1 so the area can be written as 2(x+1) as a product of the height and length or 2x+2 in expanded form). I'd then change the question slightly to can you build 3(x+1), how does that change your tiles/diagram?

The height has increased by one, there is an extra layer of x+1. Again talk through the key features. Then change the question slightly again, maybe to 3(x+2) and ask how will this one change your tiles/diagram? How will it look different?

I'd then look at 3(2x+2) how will this be different?

I'd also look at negatives, remembering the tiles are double sided for a reason. When you multiply by a negative you flip the counters. So you could look at 3(x+2) for example first, then look at 3(x-2). Show they are similar, but the second has a negative term so you could flip the one tiles from the first model/diagram to make the second model/diagram:

At some point in the process (varies depending on the group/student) they will start to see how to do the expanding without using tiles which is great but try to encourage them to use the tiles as much as possible to help build solid foundations before removing the scaffold. I find if they jump too quickly, they can make mistakes such as forgetting to multiply the second term or forgetting to multiply the coefficient of the first term.
At this point I'd look at this expanding basic worksheet for some basic practice with the tiles. Towards the end of this practice I would be thinking students could start to generalise.
I'd also look at some which are similar to 3(2-x) and how the x term will be negative in those cases, and also questions such as x(x+1) as this is sometimes a bit of a jump for students:


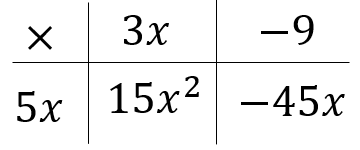
Planning your exit strategy from manipulatives is important, but you may find they need longer with tiles or less time than you'd expect with them. Some students may cope better than others, so having some options to allow progression moving away from tiles is helpful. You can move on to area models which are a bit more flexible than the tiles and would work for example on questions like 5x(3x-9) or 7(2a-3b) without using loads of tiles. The area model then lends itself well to grid method after. This progression may work well for students who struggle progressing to expanding without any tiles:
At each stage ensure you relate it back to the algebra tiles - you may want to start with an example where you can compare easily, for example 4(x+2)

4. Factorising with Algebra Tiles
When looking at factorising, students have to arrange the tiles into a rectangle. If they have already expanded using tiles, it is quite a natural progression which some will cope well with. You might start with easier questions such as factorise 3x+9. Can you arrange them into a rectangle?

What is the height? What is the length? How did you know you could use a height of 3? Link the name factorising to factors, we want to find a common factor of 3x and 9 to find the height of the rectangle. We can write 3x+9 as 3(x+3) as we have a rectangle with height 3 and length x+3.
If you look at 4x+12, you can then talk about 'fully factorised' vs factorised. The height could be 2 or 4 as they are both factors of 4x and 12.


As a scaffold to move onto after tiles, list the factors pairs for each term to help identify the height which is the highest common factor and help identify the terms which need to go in the bracket.
E.g. 4x + 12
4x has factors 4 and x, 2 and 2x, 4x and 1
12 has factors 1 and 12, 2 and 6, 3 and 4
The highest common factor is 4, so 4 would be the height. The factor pairs 4 comes from are 4 and x for the first term and 4 and 3 for the second term, so it must be 4(x + 3).
4. Expanding and simplifying
Building on expanding and all of the work done previously on simplifying by collecting like terms, you can look at expanding and simplifying two separate brackets.
Start all positive, e.g. expand and simplify 3(x+1) + 2(x+2)


I normally do it under the visualiser and write the step in the middle out under the question, so 3x+3+2x+4 would be written before the rearrangement to collect the like terms together. If you've practiced expanding with tiles and collecting like terms with tiles, this should not be a huge jump.
I'd then look at adding two brackets where there are some negatives, e.g. 3(x+2)+2(x-1)

Again, at this point we have 3x+6+2x-2, collecting the like terms we have:

So we can see it simplifies to 5x+4.
Then look at questions such as 3(x+2) - 2(x+1), so instead of collecting the like terms together you are removing the second expression from the first - similar to how we might teach subtracting with negative numbers. Think of subtraction as removing.

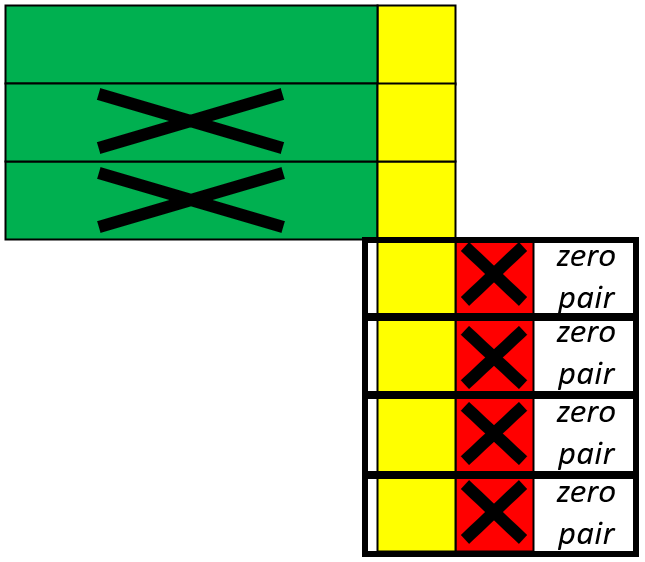
We have 3x + 6 and need to remove 2x + 2. We write that as 3x + 6 - (2x + 2). With the counters you can literally remove 2x and 2, if drawing you may want to cross out what you have removed:

What is left is an x and 4 positive 1s so the answer is x+4. This again builds on well from prior use of algebra tiles for negative numbers and collecting like terms.
A question such as 3(x+1) - 2(x-2) would initially look like:

Which gives 3x + 3 and we need to remove 2x - 4. We write this as 3x + 3 - (2x - 4). Here is where the negative counters work and knowledge of zero pairs is needed. It is easy to remove the two x's but removing four negatives when there aren't any to remove means we need to use zero pairs to create enough negatives to remove:
Again, I use this worksheet at some point in the early practice stages: expand and simplify worksheet
6. Expanding Double Brackets
Discuss what is different about 3(x+2) + 2(x+1) and (x+2)(x+1) with the students. Then ask if they can build (x+2)(x+1) with the tiles.

I'd do quite a few all positive to start off with, then some with negatives.
Initially (x+2)(x-1) and compare with the diagram above - how will it be different? Why?

Then look at (x-2)(x+1), how is that different to (x+2)(x+1)?

This time the bottom tiles are flipped over as the other term is negative.
Then look at (x-2)(x-1). First start with all positive (x+2)(x+1) then flip the 2 at the bottom first to make those negative, then flip the one at the side to make that negative:

So (x-2)(x-1) is x squared - 3x + 2.
Finally, look at some such as (x+1)(2x+3):
Planning for an exit strategy, again you could use area models which then builds nicely to grid method:

This would enable students who struggle to move away from tiles to still be able to progress to more difficult questions where tiles may be less appropriate (e.g. (3x+4)(2x-5) where you might not have the space or enough tiles to build the question) and both the area and grid method will be more appropriate methods in terms of efficiency in exams and when the tiles are no longer available.
7. Factorising Quadratics
Same as with more basic factorising, the idea is to give them the tiles and ask them to arrange them into a rectangle. You would start all positive such as x squared + 7x + 12. Explore with a couple of different questions which do factorise, asking students if they notice anything which makes the process more efficient than just trial and error - what do you know won't make it a rectangle? Why? Is it more helpful to look at the arrangement of the +1 tiles or the x tiles first? Hopefully after a couple of examples they will realise factors of the constant are most important to identify first, as they can then chose the factor pair that sums to the coefficient of x. Also- are there two different answers? What is the same and what is different?

The height is (x+4) on the first and length (x+3), the second the height is (x+3) and the length (x+4). One is a rotation/reflection of the other. Does it matter which we use? Does it matter if we write it as (x+3)(x+4) or (x+4)(x+3)? Why/why not?
Then look at when the coefficient of x is negative e.g. x squared - 5x + 6.

The ones students will find a bit trickier are those where the constant is negative, for example x squared - x - 6:

The reason these are more difficult is because you don't know exactly how many positive x and negative x tiles you have in the diagram. All you know for certain is you have an x squared tile and six -1 tiles to work with.
8. Introducing Completing the Square
I'd give some expressions for students to factorise with tiles such as x squared + 2x + 1, x squared + 4x + 4, x squared + 6x + 9 and ask what they notice about their 'rectangles':

These are 'completed squares' and make squares when you arrange the tiles. The height is the same as the length so the two brackets are the same and therefore we could write them as

Ask how they physically arrange them into a square, particularly what they do with their x or negative x tiles, as you want them to eventually work out they split them in two (hence why you half the coefficient of x when completing the square). Developing a solid understanding of the complete squares helps when they aren't exact complete squares, as it is easier to see how to adjust their complete squares if they are comfortable and familiar with them.
Then ask students if they can create a complete square with x squared + 4x + 5, keeping the coefficient of x squared 1 and keeping the coefficient of x even. What do they notice?

Why can't you make a complete square? What do you have compared to the complete square? You need an extra +1 tile compared to the complete square. So it is the complete square +1.
Do similar with x squared - 6x + 5:

This time you have too many +1 tiles so you have to remove some from you completed square. So you have your completed square - 4.
They will eventually have to move away from using tiles, as with all of the above, but I have found this really helpful for developing a conceptual understanding of what completing the square is, as opposed to just a series of steps for students to follow. The steps also come out from the tiles, as students half their x tiles to create the square, then they compare the +1 tiles there should be in the square to the +1 tiles they have in their question.


