Wednesday 14 February 2024

What I've Learned About Teaching... Speed, Density and the Gradient Using Ratio Tables

I've become a bit obsessed with ratio tables this year. After the successes of teaching percentages with them last year, I knew the next topic I needed to try them with was compound measures. My year 9's first encounter with ratio tables was basic proportion, things like best buys, recipes and exchange rates, so students were confident using ratio tables before looking at compound measures. The series of lessons I planned on speed and then density went down really well with my students using a ratio table approach. The next topic happened to be linear graphs, and I soon realised I could use ratio tables to find the gradient in the same way, and explain it to students in the same way as compound measures. The need for compound measures to have a standardised unit of 1 to be able to compare really helped students see the multiplicative relationship between all three of these topics. Hence my realisation that the gradient was a compound measure - an epiphany which really changed how I approach teaching gradient.

Below is some of what I did and what I learned:

1. Speed

I gave them a prompt to start off, one that I'd seen in my Mastery training, couldn't find so remade my own version (apologies to whoever originally did it, if anyone knows who it was let me know so I can credit them). The question was who is fastest given the times and distances:


I asked students to justify their answers. Some students had already encountered the speed distance time formula, so went straight in with that. I asked them show me another way, rather than just calculating the speed, which really stumped them. Students with no concept of speed could readily compare the Tim and Adam with the same distance (Adam runs the same distance in less time so faster than Tim) and could readily compare Sam and Tim with the same time (Sam runs further in same time so faster than Tim). The issue was comparing the two with nothing the same (Sam and Adam) and students were starting to understand the compound nature of speed and the need for one unit to be the same to compare.

As a class we then discussed some different methods. All of the different methods showed how Sam is fastest. I love opportunities to embrace different methods, and this provided a great opportunity. There were lots of "so how else could we show it?" questions posed. I purposefully avoided those students who had calculated the mean at first. I picked students who had multiplied up and used lowest common multiple to create the same distances or same times so then they could compare who either ran furthest if times were the same or who took the least amount of time if they ran the same distances (a bit like when doing best buy questions, using the lowest common multiples to create either the same amount or the same price to then compare the prices or amounts).


The ratio tables really helped support showing these different methods. Students were able to justify who was fastest and who was slowest as they'd made either the distance the same or the time the same. Students were keen to tell me the speed, but some already had misconceptions using the formula triangles to divide time by distance instead. So I encouraged the ratio tables to support them in finding the speed. If they make the time 1 second for each person, we then have meters per second and that makes them comparable.


Then it completely threw some students when I suggested we make them all run 1m and compare the time instead. "That isn't speed though miss!". To which I replied  "I wasn't asking you to find their speeds, I was asking you to find the fastest, so I didn't need to use the speed as all of these methods have helped show who is fastest". This then lead to a discussion that most of them had picked the most common method (method 4) and the method that we've all come to understand as speed as a universal way to communicate how fast things/people move, that we make the time a standardised 1 hour or 1 second and adjust the distance, the units are miles per hour (miles in one hour) kilometres per hour (km in one hour) meters per second etc. We make the time one unit so we can compare the different distances travelled in the standardised amount of time.

On reflection, I would change the initial problem to be "order them from slowest to fastest" rather than just who is fastest, and would suggest from the start I would like at least 2 different ways of justifying your answers. This is the first time I've introduced speed in this way and the impact of choosing this task as an introduction I felt really improved student understanding of what speed is, how it is compound in nature, the need to standardise to compare. Those with prior knowledge of the formula appreciated where the formula came from (as some of them remembered the formula incorrectly previously).

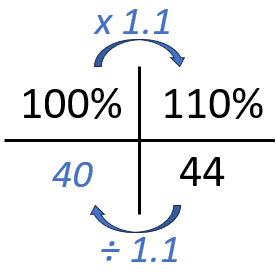
We then looked in isolation at finding speeds when given distance time, I tried to vary the questions. The ratio tables weren't given, but revealed one by one if students needed the guidance. I purposefully chose some more awkward times for students to work with too, although avoided really tricky times:

Upon reflection, here I would likely try to add a few that were more difficult times, such as an hour ten minutes, 54 minutes. Times which maybe would benefit from using a longer ratio table, to break down the time first to then multiply up to one hour (more on this below, keep reading!).

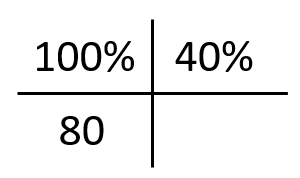
We then looked at finding distances given the speed and time. Students initially struggle with putting the speed in the table and need a bit of guidance, if it is 5m/s then how far do they go in what time? Is a good nudge, as well as emphasising the units "it is 5 METERS per 1 SECOND".


Again some trickier questions with some trickier times might have been beneficial here.

We then looked at finding the time given speed and distance.

These questions particularly lend themselves better to the breaking it down to build it up method (again, keep reading!) but also thinking about the connection across the table rather than down the table:


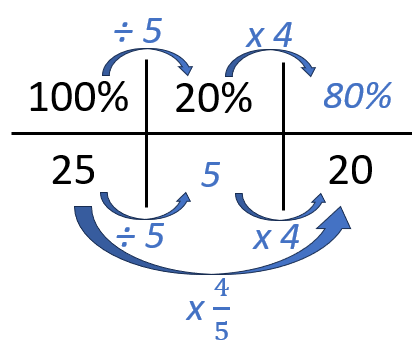
We then did a mixture including tricky units with the time (20 minutes and other fractions of hours). I've seen my wonderful colleague convert hours straight to minutes to help support students with this barrier- something I'm keen to do in the future having seen how some students really struggle with time being base 60 (rather than my approach of "what fraction of an hour is it?"). Whilst trying to highlight the most efficient ways of doing the questions (in a 2 by 2 ratio table) I always showed them alternative ways which would maybe be more suitable to non-calculator questions, where you break the units down to build them up to what you need. Some of the trickier questions students found easier if you broke the unit you wanted down to one and then built it up to the correct number (essentially the unitary method they'd previously come across, see example method on the right below):

I think it is beneficial for students to see a variety of methods so they can see how flexibly the ratio tables can be used. Some methods lend themselves better to calculators and the breaking down to 1 to build up can eventually be moved into one step as students become more confident (division is the denominator of a fraction, multiplication is the numerator). Eventually students can move away from the ratio tables as their understanding of speed develops, but they always have them to fall back on if needed. We also did some more complex questions like having two parts of a journey and finding the average speed, some I've collected from exam papers across the years, and converting from m/s to km/h and km/h to m/s (again, loving Dr Austin's worksheet on converting speeds).

2. Density

I linked this to speed in the sense of we need to 'standardise' the volume to be 1cm cubed of the substance to see what the mass was. This came about from discussing with my Science colleagues how they teach density, and they provide 1cm cubed of different metals for students to weigh, and students discover that some are heavier than others despite being the same volume, as they have more densely packed particles. I discussed this with students to activate their prior knowledge and link what they've seen in Science to what we would be doing in Maths.

Students actually found density easier than speed, but maybe this was because they'd already practiced using the ratio tables with speed problems, they'd already got to grips with the compound nature of speed which transferred well to density or that they didn't have the issue of time being base 60 to deal with.

I adapted the great Don Steward's density resources to make the numbers slightly easier as an introduction and then used his own questions after:


I then used Helen Konstantine's (aka MathsHKO) grid density questions available here (with lots of other great compound measure resources) as the numbers were nicer to get them started and had a lot of variety. I then used Dave Taylor's Increasingly Difficult Problems available here. I love these intelligent practice questions - you can tell they have been carefully considered and have years of teaching experience behind them, perfect resources ready to use in the classroom to help with the planning burden!

3. The Gradient

Now this is the one I stumbled across accidentally and coincidentally LOVED. It fit in really well as it was the topic after proportion and compound measures, the students were confident using ratio tables. Because of how I'd set out the speed and density ratio tables, and for consistency, I made the conscious decision to put change in y on the left and change in x on the right which seems counter intuitive. However, I think it worked as the density had 1 in the top right box and I felt the consistency would help. Maybe I should have also done this with speed too?

We looked at physical graphs first, and they could remember from previous years that the gradient was the steepness of the line. So I said well which is steeper and how do you know? They could tell me as you go across the steeper line goes further up compared to the other line. So I suggested it might be helpful to 'standardise' one of the directions to be 1 unit, just like in speed we use 1 hour or 1 second, just like in density we use 1cm cubed or 1m cubed. With a standardised change in x, we can then have a comparison for the change in y. Just like with the initial speed problem, we could either make time the same or distance the same to compare but the Mathematical consensus is to find 1 hour or 1 second and to force the time to be 1, and with density we compare 1 cubic centimetre or metre, the Mathematical consensus for steepness is to make standardise the change in x to be 1, which is what we know as the gradient.


I then picked a couple of different 'triangles' on the same lines to look at the change in y and the change in x in ratio tables, to show the gradient is the same in each, so when we 'standardise' to make the change in x one, we get the same change in y. They can physically see this in the graphs when they have the diagrams. We practiced a couple like this and I strongly recommended they use the ratio tables, and then use the one across is how many up or down method to check their answer (I love Dr Austin's finding gradients worksheet: Gradients from Lines).


We then moved on to gradient between two points with a sketch given (thanks to Corbett Maths for the idea of how to gently progress the types of questions and I borrowed plenty for my lessons: Corbett Gradient). I really emphasised the change in x and change in y in the ratio table as the difference in the x coordinates and the difference in the y coordinates. They practiced quite a few like this before removing the diagrams and going straight for gradient between two coordinates.

Some students were able to deduce a 'formula' of sorts, as we always ended up doing the change in y divided by the change in x, so they moved away from the tables which is great! The ratio tables are a scaffold which allow students to see the structure, so when they get to a point they realise to 'standardise' the change in x to always be 1 they end up dividing by the change in x, they understand fully what the gradient is and how to calculate it. Otherwise, from experience if you just tell them the formula they forget it or get it the wrong way round. They also were able to appreciate where the y2 - y1 / x2 - x1 formula comes from too (some of them having encountered in previously as a formula with no knowledge of why it works), knowing where a formula comes from or better supporting students to derive it themselves ensures they know how to use the formula and that they remember it correctly.

My next topic is similarity, which also includes trigonometry - I'm now really looking forward to unleashing ratio tables in those topics too. Watch this space!

Sunday 26 November 2023

What I've Learned About Teaching... Area

This is a topic that has fast become a favourite of mine to teach! I've always had an "all area is based on the area of a rectangle" approach to teaching area and showed students how to adapt the formula for area of a rectangle for other shapes, but I've found students often forget because I've not done it in enough depth, and I have to remind them every time it comes up. I was getting fed up of students forgetting to half, or halving when they shouldn't and making silly errors. I realised I wasn't teaching it as well as I thought I was. So when I collaboratively planned a lesson on area of a triangle with someone else from the Maths Hub and was given the suggestion of allowing students to cut shapes up and generate the formula themselves, I was nervous as I've had nightmare 'hands on' lessons in the past and hate the tidying up after cutting out tasks so try to avoid them. But after trying these activities with my year 8s last year, I can safely say a) it wasn't as bad as I imagined it would be in terms of mess and potential off task behaviour, students were well involved and it wasn't too messy and b) it was completely worth it for the long term benefits it brought to the students- they had a deeper understanding which meant they learned it better, more flexibly and the students remembered it longer. I also learned different ways of seeing the area - bonus as I love learning new methods!

It does need to be carefully scaffolded enabling students to eventually generate a formula for themselves (generally this happens collectively as a class rather than each student independently depending on how competent they are with algebra). Before even exploring any formula, students need a solid understanding of two things. Firstly the concept of area and secondly the units we use to measure area, ie square centimetres/square metres and what they actually are. The basic concept of area and understanding the units for area are linked and important foundational knowledge needed before looking at any formula.

The key to these activities is providing students with sufficient time to explore themselves, giving timely hints and nudges but also knowing when to stop and draw the students back together. If all else fails, you can throw the method under the visualiser yourself and ask questions to get the students to pull apart what has happened themselves, pretending if you wish that you have seen a student doing it. These tasks are perfect opportunities to celebrate different methods, and also to question for understanding and get students explaining someone else's method. Show one solution under the visualiser without telling the students anything. “How has this student shown us the area? Tell the person next to you” and provide short sharp bursts of opportunities to discuss, then clarify the method as a class, “Why are we using this length, why not that one?”. Make sure you have an idea of the different methods (detailed below) that work beforehand and dedicate enough time to discuss the different methods (depending on your group - the more methods the better ideally as it improves flexibility using formula, however you also don't want to cognitively overload your students). I then tend to generalise with words first before students practice, and one of the practice questions will have the algebraic lengths so they generalise the formula themselves eventually.

Be ready for the misconceptions - trying to shoehorn pieces of shapes which don't fit, overlapping pieces, leaving gaps and some students might cut out every single little centimetre square and part squares. If needed, you can show some of these under the visualiser to discourage them away from this, "Why do we think it might not be a great idea to do..." or "Why won't... work?".

The impact of these activities? Students learn how the formula work and where they come from, some will generate the formula themselves, and they remember how to find the area of all the following shapes with relative ease. They rarely ask me how to do it in retrieval tasks.

1.      Area of a Rectangle

Most students will have an awareness of how to find the area of a rectangle, but if they do you can always ask them to persuade you to really see if they understand. Rectangles are important as they have the square centimetres all nicely lined up and the formula is easiest to generate ("do I need to count every single square centimetre? Is there a more efficient way?"). All the other shapes have areas which can always be based on the area of a rectangle so it is worth spending some time on, even with secondary students. To support the work with perpendicular heights later on, it may be worth giving rectangles with multiple dimensions within the rectangle and asking them to identify which they need to use and why, bringing in the terminology of perpendicular height in this familiar context.


2.      Area of a Triangle

Give students a triangle on centimetre squared paper. I normally draw a couple of the same triangle on squared paper and photocopy, giving each student at least two triangles to work with.


The options are to ask them to make a rectangle or to show how the area of a triangle formula can be derived. There are multiple ways to do it. Students can cut the triangle in two pieces at half of the height, then chop the top into two triangles and use them to fill the gaps. This creates a rectangle with the same area as they have used all the paper, not lost or added any paper. The rectangle has a height which is half the original perpendicular height of the triangle and the length was the same as the triangle. See diagram below - thick blue lines are where to cut the triangle.


They could instead use two triangles to make a rectangle. They cut one of the triangles along the perpendicular height into two separate triangles, which fill the gaps on the second triangle to make a rectangle. However, the rectangle we have created has used two of the original triangles. The height of the new rectangle is the same as the perpendicular height of the original triangle, and the length is the same as the original triangle. But as we have used two triangles to create the rectangle, the area of the rectangle will be twice the area of the triangle.


I'd do mini whiteboard work at this point, to check students have understood the formula and can identify the correct sides. Sometimes I will split this into two separate checks, first which are the perpendicular height and length, then finding the area, depending on the class.


Make sure you spend time highlighting perpendicular heights, showing triangles in different orientations and types, providing too much information so students are solid in choosing the correct pair of perpendicular height and length. You can also show how there are three pairs of lengths and perpendicular heights which give the same answer and explore why that is.

I really like this question from NCETM to explore which information they need for both area and perimeter of a rectangle:


3.      Area of a Parallelogram

Again give students a parallelogram on centimetre squared paper and ask them to create a rectangle with the same area.


The easiest way to see it is if they cut a right angled triangle off one end and slide it into the gap at the other side, but realistically they can do it anywhere to get the same result. The height of the rectangle is the perpendicular height of the parallelogram. The length of the rectangle is the same as the original parallelogram. So the area of the parallelogram is 


Make sure to include plenty of practice with perpendicular heights and lengths, ensuring they look different.

I'd do a quiz again like the below on mini whiteboards:


4.      Area of a Trapezium

Give the students a trapezium on centimetre squared paper. Again, I would draw this on square centimetre paper and put several of the same on one sheet and photocopy, handing a couple to each student.


Personally I’d ask them again to make a rectangle with the same area as the original trapezium, however they can make a parallelogram relatively easily, which they should already be competent with. There are again several ways of making a rectangle from the trapezium.


The students will use half the perpendicular height whichever method they use. My preferred method is to find half the height and cut across to get two trapeziums, then cut a triangle off the smaller trapezium, rotate to fit into the gap and then rotate the remains into the gap at the other side. Then students can see the new rectangle has a height which is half the perpendicular height of the original trapezium, and the length of the rectangle is the combined lengths of the parallel sides of the original trapezium. This method also works if they don’t cut the top trapezium into a triangle and smaller trapezium, they can cut into two trapeziums instead but it is then trickier to see what the new length of the trapezium is. So the method ends up being half the perpendicular height, then multiply by the sum of the parallel sides:  


A slightly different method is to identify half the perpendicular height, then cut the right angled triangles from the perpendicular height down from each side. The triangles then rotates to fill the gaps at the top of the trapezium. This is essentially finding the average length of the parallel sides, which is where they add the sides and half, then multiply by the height:  


Another method is to use two trapezia and rotate one 180 degrees, cut a right angled triangle off one side and fill the gap to make a bigger rectangle. This time the height is the perpendicular height of the original trapezium, the length of the new rectangle is the sum of the parallel sides of the original trapezium, so the area of the bigger rectangle is height x (sum of parallel sides)

HOWEVER, we used two trapezia to make the rectangle, so one trapezium would then be half the big rectangle: 


Mini whiteboard quiz to check for understanding, again this can be broken down depending on class- which are the parallel sides? Which is the perpendicular height? Depending on the class.


During practice, ensure you show different types of trapeziums in different orientations – imagine they are estimating the area under a curve using trapezia at KS4! They need to be confident spotting trapezia however they may come across them.

I also think showing all three methods and providing questions where one method is easier to use than the other two is a great exercise to develop some fluency and flexibility in how students use this more complex formula. Which method did we use for this trapezium? Why?

Thursday 31 August 2023

What I've Learned About Teaching... Percentages with Ratio Tables

I've seen and read a lot about ratio tables and my initial attempts to use them started with year 8 percentages. They already had an idea of how to find basic percentages and an idea of FDP from year 7. I showed them a couple of different ways of visualising finding percentages of amounts, including dual number lines and ratio tables. We discussed which methods they liked and why. I was really surprised they liked the ratio tables, so I decided to stick with ratio tables to do some of the more complex percentage problems they needed to do and was surprised how universal they were for percentage problems, and how naturally multipliers come out of the method.

As with a lot of scaffolds, structures or manipulatives students need to be able to do the basics to be able to do more complex things later. You have to lay the foundations first! I would even go back and ensure they understand the principles of basic ratio tables before even introducing them in a percentages context. Ratio tables are a useful scaffold for many topics across the curriculum, and the more confident they are with the basics the easier they become in more difficult contexts. It is well worth investing time in the basics if you want to see the impact long term.

1. Basic percentages of amounts

I started with basic percentages of amounts to get students used to the structure and start the thinking about multipliers.

For example, find 40% of 80:

To set up the grid, I've always started with 100% in the top left box and the other percentage in the top right box. The bottom left box has the original amount/the full amount/100% in it, and then as we are trying to find 40% of 80, that is the box that is empty. There are then several ways of moving forward, depending on how confident your students are with multiplying decimals.

Highlighting the different methods and why they work is also useful at the beginning, so that students can use the ratio table more flexibly later on in the topic.

Method 1: Multiplying across
Students may need prompting and even practice before you start with the ratio tables of 100 x ___ = 40 to help them identify the multipliers more easily. They also seem to see multipliers when you highlight the equivalence between percentages and decimals, so a nudge of "what is 40% as a decimal?" will often get students the multiplier. After a bit of practice they generally get used to using the multipliers without too much thought, but if students are struggling they could try method 2 instead.

Method 2: Break it down to build it up
This may potentially be how they would do it traditionally, just in a more formatted way. This method would eventually lend itself to one step, as you may be able to guide students into seeing that dividing by ten then multiplying by 4 is the same as multiplying by 0.4.

Method 3: Multiplying down

This method is one I've found difficult to explain in the past without the use of ratio tables. The ratio tables really help to highlight this structure. It is sometimes easier to use this relationship, for example if it is a factor or multiple of 100 because students can either divide in one go or multiply in one go.

Now you might at this point be thinking, why use ratio tables for basic percentages of amounts when plenty of students can do so easily without - well the students need to understand how to use the structure and it actually helps if they have some prior knowledge to attach it to. Then they can go on to do more complex percentage questions. Depending on how quickly they pick up the basics, you can move on to other percentage questions so students can see the similarities and differences between the different types of questions.

I would use some carefully thought out questions, such as these to enable students to practice and to highlight what stays the same and what changes between each question:


Also discussing different methods and which is most efficient for each question or if there is anything surprising between the questions.

2. Percentage Increase and Decrease

Next I'd introduce percentage increase and decrease in a similar way. I again used dual number lines to help the visual of increasing by a percentage meaning we would end up with more than 100% and decreasing meaning we would end up with less than 100%. It is important students understand the percentage they are trying to find (e.g. a 20% increase will result in 120% of the original) to then use the ratio table.

Example: Increase 70 by 20%


Setting up the ratio table, again I always start with 100% top left with the full amount underneath, then the percentage I'm looking to find top right, in this case 120%. So now we find the gap using one of the methods below either in one step (preferable):

Or if students need to, in two or more steps:


In which case, you support students in aiming to get towards one step eventually as it is the most efficient way - particularly when students have a calculator. It is also quite nice to let students discuss how dividing by ten and multiplying by twelve is the same as multiplying by 1.2 and also dividing by 5 and multiplying by six. You can write them as fractions instead of decimals and really reinforce the importance and equivalence of FDP.

Some questions I might give students to practice and hopefully get them thinking:


3. Finding the original (100%) or Reverse Percentages

The cost of a train ticket increases by 10%. It now costs £44 for a return to Liverpool. How much did it cost before the price increase?

So in this question, we are given different information. Students may struggle initially working out what goes where in their table, but once they have the table filled in, it isn't a massive jump from increasing and decreasing by a percentage:


So the set up is different because this time, you are given that 110% is £44 in the question.

If students are confident with inverse operations, they can then use the fact they need to use inverse operations to find 100%:

It is more difficult, but not impossible, to use the relationship downwards, but this is where students may need fluency converting between fractions, decimals and percentages, and fluency knowing dividing by 10 and multiplying by 4 can also be written as multiplying by 4 tenths:

And as with previous examples, you can break it down into stages:

Again, this is with the aim of eventually being able to do it using a single multiplier in one go.

I'd ask some questions such as the following to hopefully get students thinking whilst practicing:


4. Writing as a percentage/percentage change

You can also use the structure to write anything as a percentage or to find a percentage change.

Example: Sally gets 20 out of 25 on her spelling test. What is her score as a percentage?


This time we are told 100% full marks is 25, the score is 20 so we need to find that as a percentage (top right corner). There are two ways of doing this one downwards:


As a bit of a bonus in terms of building connections, you can discuss why x by 0.25 or one quarter is equivalent to dividing by 4 and there is potential to bring in reciprocals.

Again, if needed split into steps which also can lend itself to relating the FDP equivalence again, and lends itself to discussing reciprocals:


Again, I'd give them some questions to practice whilst also trying to get them to reflect on similarities and differences:


And once they've done all the different types of questions, giving them some which I believe might count as 'same surface, different depth' to pull out the wording of questions and which is which type of question:


I'd also, from experience, ensure I show different contexts other than just money, so students see plenty of different contexts where percentages questions arise so they can apply the knowledge more flexibly to different contexts.

The students seemed to find the ratio tables really useful, as it was one structure to answer every type of question. They seem to more easily grasp multipliers as a concept and more naturally see when to divide by the multiplier. I really love how they highlight different relationships that other methods maybe wouldn't so easily lend themselves to. I am really looking forward to seeing how they will work beyond just percentages!

Sunday 4 June 2023

What I've Learned About Teaching... Algebraic Manipulation with Algebra Tiles

I am still learning and reflecting constantly on how I'm using algebra tiles in lessons, but I hope there is something in this blog post which is helpful to anybody else who wants to give algebra tiles a go. I strongly recommend the NCETM CPD materials on Algebra Tiles as an excellent resource and MathsBot as a way for students and yourself to use algebra tiles if you aren't yet ready to invest in the manipulatives yet! I've found they've had a massive impact on my teaching, students make less mistakes and retain their manipulation skills better than any other method I've previously used. I encourage you to have a go with any of your students and see the impact for yourself!

This blog is quite long so if you want to skip to find a specific bit of algebra, here is the order I've gone with:

1. Introducing Tiles

2. Collecting Like Terms   (worksheet here)

3. Expanding single brackets    (worksheet here)

4. Factorising single brackets

5. Expanding and simplifying e.g. 3(x+1)+2(x+2)    (worksheet here)

6. Expanding double brackets e.g. (x+2)(x+3)     (worksheet here)

7. Factorising quadratics

8. Completing the square

1. Introducing the Tiles:

Firstly, students need to get used to what each tile represents. It is worth spending time on this and leads well into collecting like terms (next stage) anyway. The concept of +1 and -1 shouldn't be too far of a stretch if you have taught directed or negative numbers using two sided counters as they are very similar, just square instead of circular:


The new counters for students to get used to are the x tiles and x2 tiles. The negative versions are the same but red, just as with the +1 and -1.


Notice that the area of the tiles is what we are referring to, the 1 square is 1 unit by 1 unit with an area of 1. When introducing the x tiles, you need to show that the height of the x is 1 and the length is x so the area is x. You then need to introduce x2 in the same way using the x tiles.

The x tile is x long and the square tiles are x long and x tall, so the area of the tiles are x2.

At this point you may want to also expand on zero pairs (see my post on teaching directed number here:) and show how a positive x and a negative x is a zero pair, an x2 and a -x2 tile make a zero pair etc as that will help with simplifying later on.

2. Collecting Like Terms:

The algebra tiles are a really good way of showing visually what collecting like terms looks like. For example, students can see a question such as 3x + 2 + 2x + 3 initially as:


Then they can physically move the tiles to collect the same tiles together, which you can show them and ask which is easier to use to simplify? Why?


So 3x + 2 + 2x + 3 = 5x + 5

Then you can build on the work on negative numbers as zero pairs by doing questions such as 3x-2+x+4 which they can see initially as:


And then you can collect the like terms to see:

So 3x-2+x+4 = 4x+2

This rearrangement makes it easy for students to see zero pairs and whether the terms will end up being positive or negative.

Show a similar question where the numerical term will be negative, e.g. 3x+2+x-3


Which looks like this when the like terms are collected:

So 3x+2+x-3 = 4x - 1

You can then build up to 3x + 2 - x + 1


Which looks like this when the like terms are collected:


So 3x + 2 - x + 1 = 2x + 3

This makes it easier for students to start processing zero pairs being more than just +1 and -1 and helps students deal with when terms are positive or when the terms are negative (more negative tiles than positive tiles).

E.g. x + 5 - 3x - 2


Which looks like this when you collect the like terms:

So x + 5 - 3x - 2 = -2x + 3

You can also then include some questions with x squared terms.

I normally use this collecting like terms worksheet to practice collecting like terms and structure some initial practice.

3. Expanding Single Brackets

I actually start with the diagram when expanding and factorising and do them alongside one another, initially referring to them as two different forms - expanded and factorised equivalent expressions. This is just my own preference to start off so students can see how the two are connected, I then focus on expanding to develop some fluency and removing the scaffold of the tiles for expanding before bringing back the tiles to focus on factorising afterwards again aiming to develop fluency and eventually move away from the tiles.

So, for example, I might start with this diagram:


I'd ask how students see the diagram. Students find the expanded form easier to see, so you have to tease out the factorised form. Discuss the fact it is a rectangle. You can talk about the area of the rectangle and the height and the length of the rectangle. I would also write each on the board: "expanded: 2x + 4" and "factorised: 2(x+2)" and discuss how and why both represent the area of the rectangle.

I'd then ask students to build some with their tiles, starting with something like 2(x+1):


Highlighting the key features (height is 2, length is x+1 so the area can be written as 2(x+1) as a product of the height and length or 2x+2 in expanded form). I'd then change the question slightly to can you build 3(x+1), how does that change your tiles/diagram?


The height has increased by one, there is an extra layer of x+1. Again talk through the key features. Then change the question slightly again, maybe to 3(x+2) and ask how will this one change your tiles/diagram? How will it look different?


I'd then look at 3(2x+2) how will this be different?


I'd also look at negatives, remembering the tiles are double sided for a reason. When you multiply by a negative you flip the counters. So you could look at 3(x+2) for example first, then look at 3(x-2). Show they are similar, but the second has a negative term so you could flip the one tiles from the first model/diagram to make the second model/diagram:


At some point in the process (varies depending on the group/student) they will start to see how to do the expanding without using tiles which is great but try to encourage them to use the tiles as much as possible to help build solid foundations before removing the scaffold. I find if they jump too quickly, they can make mistakes such as forgetting to multiply the second term or forgetting to multiply the coefficient of the first term.

At this point I'd look at this expanding basic worksheet for some basic practice with the tiles. Towards the end of this practice I would be thinking students could start to generalise.

I'd also look at some which are similar to 3(2-x) and how the x term will be negative in those cases, and also questions such as x(x+1) as this is sometimes a bit of a jump for students:

If you ask them to build it, they may well start doing something like this:

And realise they don't know how tall it is. So then you can prompt them do they have a tile that is x tall, as the height needs to be x for the model/diagram. Hopefully at this point they will realise they need the blue x squared tile to get the correct height for the diagram. It is useful for later (double brackets) if they get to grips with multiplying by x meaning the height has to be x, so worth doing a couple of these.

Planning your exit strategy from manipulatives is important, but you may find they need longer with tiles or less time than you'd expect with them. Some students may cope better than others, so having some options to allow progression moving away from tiles is helpful. You can move on to area models which are a bit more flexible than the tiles and would work for example on questions like 5x(3x-9) or 7(2a-3b) without using loads of tiles. The area model then lends itself well to grid method after. This progression may work well for students who struggle progressing to expanding without any tiles:


At each stage ensure you relate it back to the algebra tiles - you may want to start with an example where you can compare easily, for example 4(x+2)


4. Factorising with Algebra Tiles

When looking at factorising, students have to arrange the tiles into a rectangle. If they have already expanded using tiles, it is quite a natural progression which some will cope well with. You might start with easier questions such as factorise 3x+9. Can you arrange them into a rectangle?


What is the height? What is the length? How did you know you could use a height of 3? Link the name factorising to factors, we want to find a common factor of 3x and 9 to find the height of the rectangle. We can write 3x+9 as 3(x+3) as we have a rectangle with height 3 and length x+3.

If you look at 4x+12, you can then talk about 'fully factorised' vs factorised. The height could be 2 or 4 as they are both factors of 4x and 12. 


The tiles really become useful again after expanding as the ability to move them into different groupings to get them into a rectangle is really useful in the first stages. During the initial stages of practice, keep referring to factors and the height. When students are building them, encourage to think what the height might be before they try to get the tiles into a rectangle.

As a scaffold to move onto after tiles, list the factors pairs for each term to help identify the height which is the highest common factor and help identify the terms which need to go in the bracket.

E.g. 4x + 12

4x has factors 4 and x, 2 and 2x, 4x and 1

12 has factors 1 and 12, 2 and 6, 3 and 4

The highest common factor is 4, so 4 would be the height. The factor pairs 4 comes from are 4 and x for the first term and 4 and 3 for the second term, so it must be 4(x + 3).

4. Expanding and simplifying

Building on expanding and all of the work done previously on simplifying by collecting like terms, you can look at expanding and simplifying two separate brackets.

Start all positive, e.g. expand and simplify 3(x+1) + 2(x+2)


Encourage students to build it and collect the like terms together.


I normally do it under the visualiser and write the step in the middle out under the question, so 3x+3+2x+4 would be written before the rearrangement to collect the like terms together. If you've practiced expanding with tiles and collecting like terms with tiles, this should not be a huge jump.

I'd then look at adding two brackets where there are some negatives, e.g. 3(x+2)+2(x-1)


Again, at this point we have 3x+6+2x-2, collecting the like terms we have:


So we can see it simplifies to 5x+4.

Then look at questions such as 3(x+2) - 2(x+1), so instead of collecting the like terms together you are removing the second expression from the first - similar to how we might teach subtracting with negative numbers. Think of subtraction as removing.


We have 3x + 6 and need to remove 2x + 2. We write that as 3x + 6 - (2x + 2). With the counters you can literally remove 2x and 2, if drawing you may want to cross out what you have removed:


What is left is an x and 4 positive 1s so the answer is x+4. This again builds on well from prior use of algebra tiles for negative numbers and collecting like terms.

A question such as 3(x+1) - 2(x-2) would initially look like:


Which gives 3x + 3 and we need to remove 2x - 4. We write this as 3x + 3 - (2x - 4). Here is where the negative counters work and knowledge of zero pairs is needed. It is easy to remove the two x's but removing four negatives when there aren't any to remove means we need to use zero pairs to create enough negatives to remove:


This leaves us with an x and 7 positives, which simplifies to x + 7.

Again, I use this worksheet at some point in the early practice stages: expand and simplify worksheet

6. Expanding Double Brackets

Discuss what is different about 3(x+2) + 2(x+1) and (x+2)(x+1) with the students. Then ask if they can build (x+2)(x+1) with the tiles.


They need to get a height of x+2 and a length of x+1. Again, it is worth at this point reminding them the lengths of each of the tiles, and they will likely initially try the green x tiles and yellow +1 tiles instead of the blue x squared tile and green x tiles. The above simplifies to x sqaured + 3x + 2.

I'd do quite a few all positive to start off with, then some with negatives.

Initially (x+2)(x-1) and compare with the diagram above - how will it be different? Why?


If a term is negative, we flip the tiles over. This simplifies to x squared + x - 2.

Then look at (x-2)(x+1), how is that different to (x+2)(x+1)?


This time the bottom tiles are flipped over as the other term is negative.

Then look at (x-2)(x-1). First start with all positive (x+2)(x+1) then flip the 2 at the bottom first to make those negative, then flip the one at the side to make that negative:

So (x-2)(x-1) is x squared - 3x + 2.

Finally, look at some such as (x+1)(2x+3):


Which simplifies to 2 x squared + 5x + 3. Do some more expanding double brackets with coefficients and negative terms with the tiles and allow students to make their own connections.

The worksheet I'd use for practicing double brackets is slightly longer but could be split up into smaller tasks instead of one big one: expanding double brackets worksheet

Planning for an exit strategy, again you could use area models which then builds nicely to grid method:


This would enable students who struggle to move away from tiles to still be able to progress to more difficult questions where tiles may be less appropriate (e.g. (3x+4)(2x-5) where you might not have the space or enough tiles to build the question) and both the area and grid method will be more appropriate methods in terms of efficiency in exams and when the tiles are no longer available.

7. Factorising Quadratics

Same as with more basic factorising, the idea is to give them the tiles and ask them to arrange them into a rectangle. You would start all positive such as x squared + 7x + 12. Explore with a couple of different questions which do factorise, asking students if they notice anything which makes the process more efficient than just trial and error - what do you know won't make it a rectangle? Why? Is it more helpful to look at the arrangement of the +1 tiles or the x tiles first? Hopefully after a couple of examples they will realise factors of the constant are most important to identify first, as they can then chose the factor pair that sums to the coefficient of x. Also- are there two different answers? What is the same and what is different?


The height is (x+4) on the first and length (x+3), the second the height is (x+3) and the length (x+4). One is a rotation/reflection of the other. Does it matter which we use? Does it matter if we write it as (x+3)(x+4) or (x+4)(x+3)? Why/why not?

Then look at when the coefficient of x is negative e.g. x squared - 5x + 6.


These work in a similar way to the all positive ones, except they will have a negative in each bracket. So they will be looking at factors of 6 which sum to -5 (i.e. two negative terms) so this will factorise to (x-2)(x-3).

The ones students will find a bit trickier are those where the constant is negative, for example x squared - x - 6:


The reason these are more difficult is because you don't know exactly how many positive x and negative x tiles you have in the diagram. All you know for certain is you have an x squared tile and six -1 tiles to work with.

8. Introducing Completing the Square

I'd give some expressions for students to factorise with tiles such as x squared + 2x + 1, x squared + 4x + 4, x squared + 6x + 9 and ask what they notice about their 'rectangles':


These are 'completed squares' and make squares when you arrange the tiles. The height is the same as the length so the two brackets are the same and therefore we could write them as 

We can also look at x squared - 2x + 1, x squared - 4x + 4 and x squared - 6x + 9:

These are also all 'completed squares' as all the tiles can be arranged into a square.

Ask how they physically arrange them into a square, particularly what they do with their x or negative x tiles, as you want them to eventually work out they split them in two (hence why you half the coefficient of x when completing the square). Developing a solid understanding of the complete squares helps when they aren't exact complete squares, as it is easier to see how to adjust their complete squares if they are comfortable and familiar with them.

Then ask students if they can create a complete square with x squared + 4x + 5, keeping the coefficient of x squared 1 and keeping the coefficient of x even. What do they notice?


Why can't you make a complete square? What do you have compared to the complete square? You need an extra +1 tile compared to the complete square. So it is the complete square +1.

Do similar with x squared - 6x + 5:


This time you have too many +1 tiles so you have to remove some from you completed square. So you have your completed square - 4.

They will eventually have to move away from using tiles, as with all of the above, but I have found this really helpful for developing a conceptual understanding of what completing the square is, as opposed to just a series of steps for students to follow. The steps also come out from the tiles, as students half their x tiles to create the square, then they compare the +1 tiles there should be in the square to the +1 tiles they have in their question.


What I've Learned About Teaching... Speed, Density and the Gradient Using Ratio Tables

I've become a bit obsessed with ratio tables this year. After the successes of teaching percentages with them last year, I knew the next...